
If your inspection camera isn’t performing as it should, pinpointing the issue is important.
Start by checking for cable damage and wear, such as frayed or kinked sections, visible tears, and inconsistent video quality.
For reel tension problems, ensure the cable reels in and out smoothly and look for any blockages. If the video is blurry or keeps cutting out, try cleaning the camera lens and making sure all connections are secure.
Address power and connectivity problems by verifying that the power source is stable and connections are intact. Lastly, if you hear strange noises or the camera is difficult to maneuver, it might be necessary to inspect and maintain the moving parts.
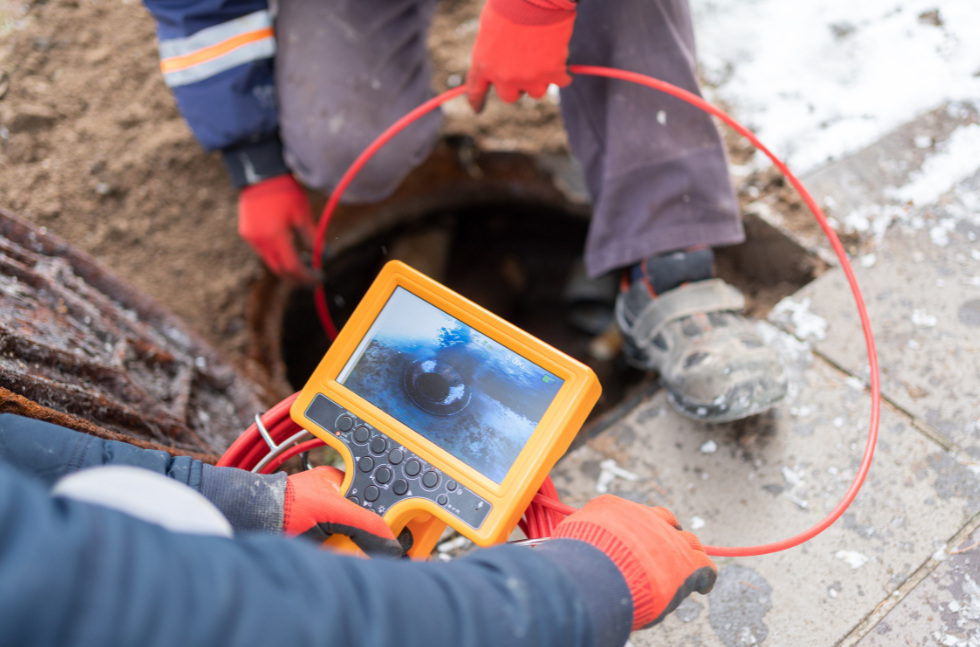
Inspection cameras are important for plumbers. They provide a clear view inside pipes and help diagnose issues without the need for invasive measures. However, these cameras can have issues, especially with cables and reels. Damaged or faulty cables and reels can mess up inspections, causing delays and incomplete findings.
In this guide, we’ll look at the common problems with inspection camera cables and reels. By understanding these problems and knowing how to fix them, you can keep your inspection equipment working efficiently and reliably.
Common Issues with Inspection Camera Cables and Reels
Inspection cameras are invaluable for plumbers, providing the ability to view inside pipes and diagnose issues without requiring digging or disassembly. However, the cables and reels that these cameras use can sometimes encounter problems. Understanding and addressing these common cable and reel issues is crucial for effective plumbing troubleshooting with inspection cameras.
The following are the common problems with inspection camera cables and reels and how to fix them:
Cable Damage and Wear
The cables used in inspection cameras are built to be flexible and durable, but they are not invincible. Over time, they can wear out or get damaged. This can happen due to frequent use, improper handling, or just the tough conditions they work in.
Recognizing the signs of cable damage early can prevent bigger problems and keep your camera operating smoothly.
Signs
1. Frayed or Kinked Cables
You might notice parts of the cable that are frayed or have tight bends. These kinks can affect how the camera moves and how well it transmits video.
2. Visible Tears
Tears or cuts in the cable sheath are a clear indication of damage. These can expose the internal wires and lead to poor performance or failure.
3. Poor or Inconsistent Video Feed
If the camera’s video is choppy, blurry, or keeps cutting in and out, it could be due to damage to the cable. This affects how well the camera sends images to the monitor.
Solutions
1. Regular Inspections
Make it a habit to check your cables regularly. Look for any signs of fraying, kinks, or tears. Catching these early can help you fix problems before they become big.
2. Immediate Replacement
If you find a section of the cable that is damaged, replace it right away. Continuing to use a damaged cable can lead to more severe problems and costly repairs.
3. Careful Handling and Storage
Always handle your cables gently. Avoid pulling them around sharp corners or forcing them into tight spaces. When not in use, store your cables properly to keep them safe from physical damage. This can significantly extend their lifespan.
Reel Tension Problems
The reel is an important part of an inspection camera system, as it helps in managing the cable efficiently. However, tension problems with the reel can arise, making it difficult to use the camera smoothly.
Knowing how to identify and fix these issues can help maintain the operational efficiency of your equipment.
Signs
1. Difficulty Reeling the Cable In or Out
If you find it hard to pull the cable out or reel it back in, the tension might be too tight or there could be an obstruction in the reel.
2. Cable Getting Stuck During Use
The cable may get stuck or jammed when trying to move it, which can interrupt your work and potentially damage the cable or reel.
Solutions
1. Check for Obstructions
Inspect the reel for any debris or objects that could be obstructing the cable’s movement. Removing any obstructions can help restore smooth operation
2. Adjust Tension Settings
Make sure the tension settings on the reel are properly adjusted. Too much or too little tension can make it hard to reel the cable in and out smoothly. Adjust the settings until the cable moves freely and easily.
3. Lubricate Moving Parts
If necessary, apply lubrication to the moving parts of the reel. This can reduce friction and make it easier to reel the cable in and out without any resistance.
Image Transmission Issues
Clear and consistent video transmission is important for the effective use of inspection cameras. Problems with image transmission can significantly impair the camera’s ability to provide accurate and useful visuals.
Signs
1. Blurry or Flickering Video
A blurry or flickering video feed can make it hard to see what’s happening inside the pipes, reducing the effectiveness of your inspection.
2. Video Feed Cutting In and Out
If the video feed keeps stopping and starting, it can indicate problems with the connections, the cables, or the camera itself.
3. No Image at All
A completely blank screen or no video signal indicates a major issue, possibly with the camera, the cables, or the connections.
Solutions
1. Check Connections
Make sure all the connections between the camera and the monitor are secure. Loose or faulty connections can cause intermittent or no video feed.
2. Ensure Proper Attachment
Verify that the cables are properly attached and in good condition. Damaged cables or improper reeling can disrupt the transmission of video signals.
Power and Connectivity Problems
Reliable power and stable connections are vital for the smooth operation of inspection cameras. Problems with power or connectivity can prevent the camera from functioning properly, leading to interruptions in your work.
Here’s how to recognize and address these issues.
Signs
1. The Camera Doesn’t Turn On
If the camera fails to power on, it could be due to power supply issues, faulty cables, or loose connections.
2. The Camera Loses Connection During Use
Losing connection while the camera is in use can disrupt inspections and may be caused by unstable power, loose connections, or damaged cables.
Solutions
1. Ensure Stable Power Source
Check that your power source is stable and connected securely. Unstable or weak power supply can cause the camera to shut down unexpectedly.
2. Check Battery Level
If your camera uses batteries, make sure they are fully charged. Replace them if they are running low to prevent power interruptions.
3. Verify All Connections
Ensure that all power and data connections are secure and functioning correctly. Loose or damaged connections, particularly in the cables and reels, can cause the camera to lose power or connectivity.
Mechanical Failures
Mechanical issues can hinder the performance of your inspection camera and reel, affecting the camera’s movement and overall functionality.
Recognizing and fixing these problems early can prevent more severe damage and costly repairs.
Signs
1. Strange Noises from the Camera or Reel
Unusual sounds during operation can indicate mechanical problems within the camera or reel system.
2. Difficulty Moving the Camera
If the camera is hard to maneuver, there might be an issue with the moving parts or the mechanical alignment.
3. Complete Mechanical Breakdown
A complete failure where the camera or reel stops working altogether suggests significant mechanical damage.
Solutions
1. Inspect for Broken Parts
Look for any broken or worn-out parts in the camera or reel. Identifying and replacing damaged components can restore functionality.
2. Repair or Replace as Needed
Depending on the issue, you may need to repair or replace faulty parts. Ensure that repairs are done promptly to avoid further damage.
3. Regular Maintenance and Servicing
Routine maintenance, including cleaning and lubricating moving parts, can prevent mechanical problems and keep your equipment in good working order.
Overall, maintaining inspection cameras in good working order is important for any plumbing professional. By knowing and addressing common issues with cables and reels, you can ensure that your equipment performs reliably. Keeping your tools in top condition not only saves time and money but also enhances your ability to provide excellent service to your clients.
Regular camera head replacement when needed is also crucial to maintain the quality and functionality of your inspection system. Additionally, incorporating regular inspection system calibration tips can help maintain the accuracy and performance of your equipment.